CSI
Campell Scientific inc. loggers can be imported directly through the web interface of VDV, where commands to the logger can be created as well.
Configuring
Setup
To set up a new data logger, navigate to Data Source -> CSI and click + in the top right corner, and the setup window for a New Logger will open up.
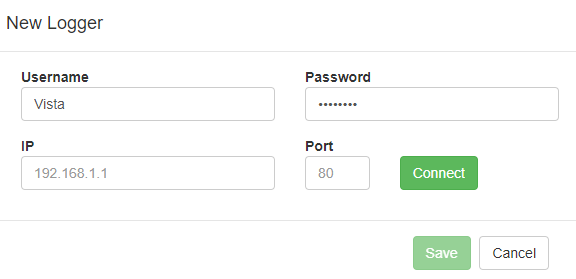
Type in the Username, Password, IP address, and the port for the data logger and click connect. Once the connection is established, the window will expand to finish the setup.
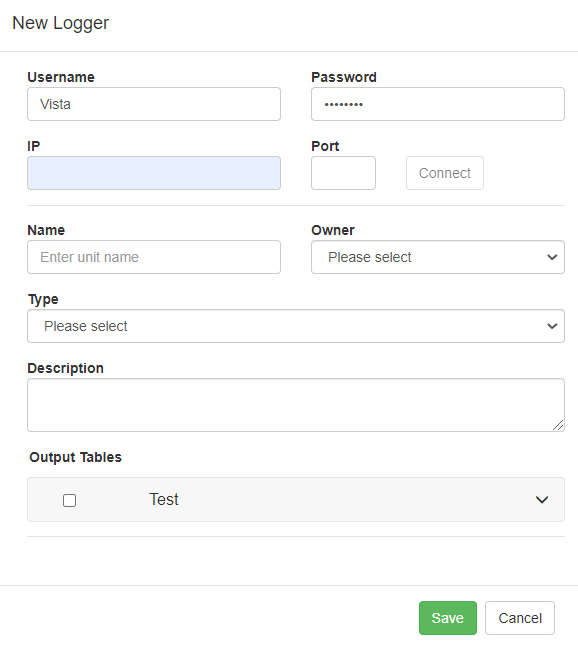
Enter a Name for the Logger, select an Owner and choose the Logger Type. A description for the logger can be stored as well.
The data logger will have one or more Output Tables defined. Select all tables that should be imported into VDV. Each selected Output Table will become a new VDV Site.
The logger can now be seen under Data Source -> CSI, where it is possible to view, edit, and delete it.

Commands
Commands allow users to send values to variables defined in the logger.
This allows users to perform actions in VDV that will result in changes in the data logger. The user's imagination is the only limit of the possible actions that can be performed.
Typical actions may include:
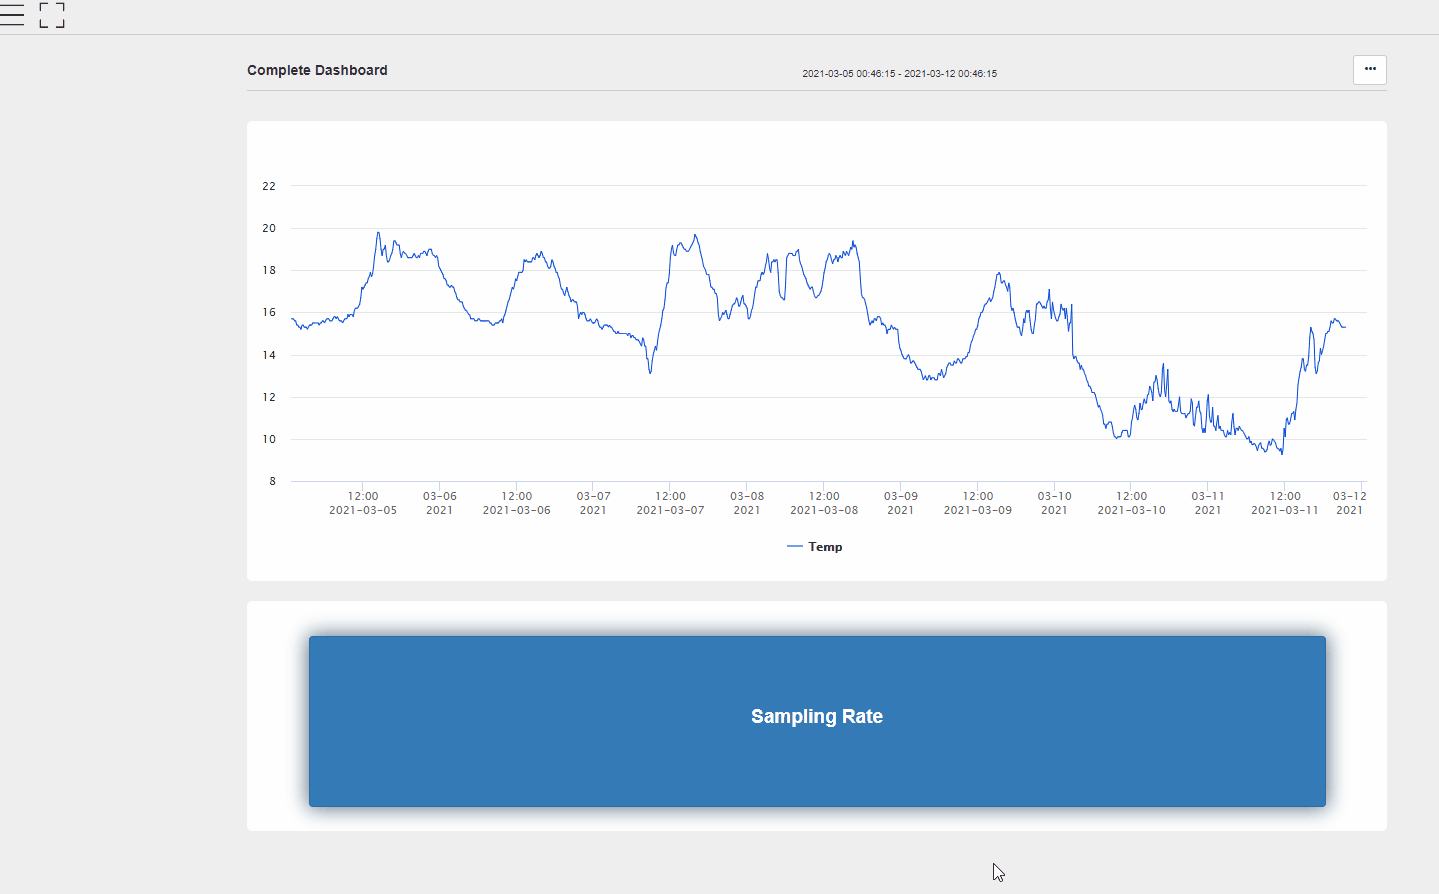
- Changing sampling rate for an Output Table
- Turning on/off a pump/light/siren/etc
- Changing the opening of a Valve
- Taking a camera snapshot
Commands are configured by selecting the Commands button in the top right corner.

This will open up the CSI Commands window.

Select the + icon in the top right corner to add new commands.
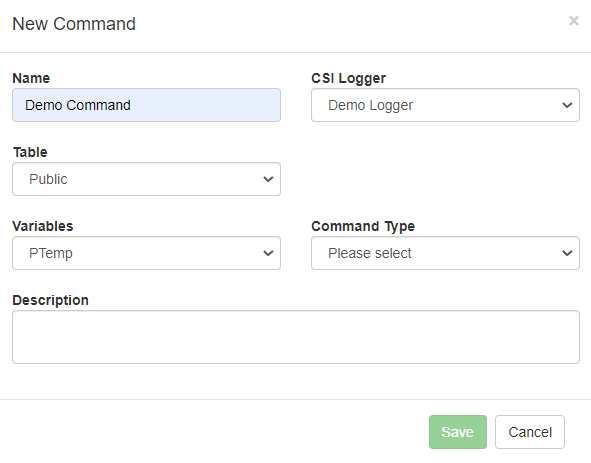
Give the Command a Name and select the Logger to control.
The Table drop-down list will be populated with all defined Tables in the selected Logger. Select the Table that contains the variable that shall be controlled. Most often, this will be a variable in the Public Table.
After selecting a Table, the Variables drop-down list will be populated with all variables in the Table. Select the variable that VDV shall control.
Then select the Command Type. Possible options are Boolean, Numeric, and List. A detailed description of these options can be seen below.
Click Save to finish the setup, and the command will be visible in the command list under Data Source -> CSI -> Commands.

Command Types
The Command types for CSI loggers are Boolean, Numeric, and List.
Boolean Commands
Boolean Commands are shown as a toggle control where the user can define the value sent to the logger for both On & Off values.
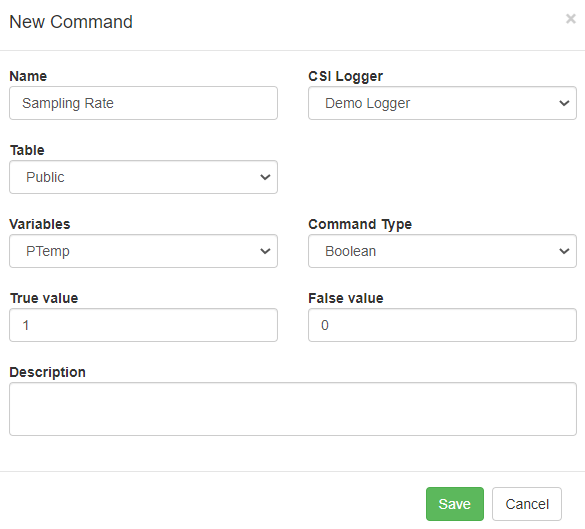
As an example, a Command can be created to change the sample rate. The default sample rate for the Logger is every 10 minutes.
A Boolean Command can be created to change the sample rate to 1 minute. Here the True Value indicates a faster rate, and the False value indicates the standard rate every 10 minutes.
Numeric Commands
Numeric commands allow the user to send in precisely the value they want. This allows for a great deal of flexibility.
It is possible to set the range for allowed values by setting the Min & Max values. It is also possible to control if floating-point values can be entered or only decimal values (Precision=0).
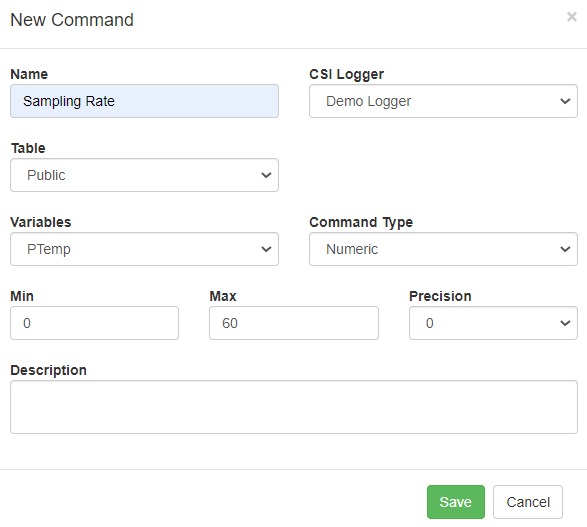
As a continued example for setting the sample rate of a logger, the user could enter the exact sample rate in minutes for the logger. The range could be limited to 1 - 60, allowing the user to set a custom log rate between 1 and 60 minutes.
List Commands
List Commands are a predefined list of possible Command options that the user can select when sending a Command.

As a continued example for setting the log rate of a logger, the user could be allowed to select from a list of possible log rate options.
The command can define 5 minutes, 10 minutes, 25 minutes, and 40 minutes as options, and the user can select between them when changing the log rate.
In many cases, this will be the preferred Command method since it gives great flexibility and gives a fixed number of options that can then be programmed and tested in the data logger program.
How to implement Commands in CSI loggers
Commands in VDV allow the user to send a value from the VDV web interface directly to a variable defined in a logger.
To utilize this functionality, the handling of the command must be defined in the data logger program.
A basic example can be taking a camera snapshot by sending a command from VDV.
A variable would be created in the data logger program, most often in the Public Table, to receive the command value from VDV. The variable can be named "vdv_camera_snapshot". This variable would be initialized with a 0 (zero) value.
In the main program of the data logger, an IF statement checks if the value of vdv_camera_snapshot = 1. if it is, then an output to trigger the camera is set to true and then after a time delay, the output is set back to false. The vdv_camera_snapshot is also set to 0 after setting the output.
Additionally, it might be of interest to log how often the command is set. Then for each time a command is set, the vdv_camera_snapshot is detected as =1, and the counter would be incremented by one. The counter would then be logged as part of the logger output table.
Sending Commands
Directly
Commands can be sent directly from the Command List by pressing the  button.
Dashboard
Data Source commands can be added to any Dashboard in VDV, allowing the user to give a command by the push of a button. This allows for a more natural flow of sending commands directly from a data display.
In Dashboard settings, when adding a component, select the Data Source Command.
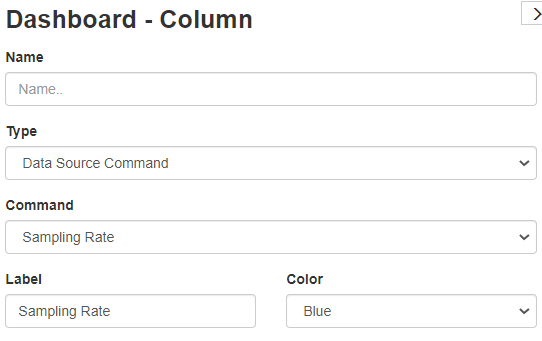
The Command will appear as a button on the Dashboard.
Notice that Users must be given access to be able to send Commands.

Clicking on the button will open up a popup window for the Command. The user can select the value and then send it to the logger.