Setting up a webcam
Why use a webcam?
Having a webcam of work sites provides excellent visual documentation. It also allows users to see worksite surroundings in the office, and the images may also be used in other project documentation. Adding a webcam to a site to catch images at regular intervals and forward them to an FTP site can give users a valuable addition to trend lines and other data. They can be set to upload a picture every minute or every hour. When viewing the feed in VDV, the latest image is shown, and when browsing through them, they can be associated with time and trend lines.
Configuring webcams

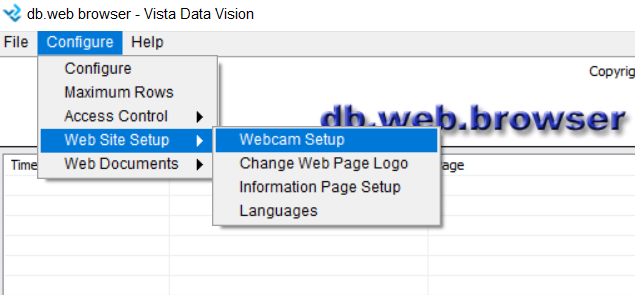
To configure webcams from the db.web.browser, select Configure -> Web Site Setup -> Webcam Setup.
To create a new webcam, press New Webcam.
Name: Enter a name for the webcam. This name will be used to identify the webcam on the web.
Location: The directory where the pictures for the webcam are located. Press the directory button and browser to the webcam folder and press "Select Cur Dir".
File Prefix: If images from many sources are located in the webcam folder, enter a File Prefix. For example, if images from the webcam are named "location_0001.jpg", "location_0002.jpg, etc., then the File Prefix would be "location_". It is good practice to enter a file prefix even if the directory only contains pictures from one webcam.
File Type: The file type of images from the webcam. Only images with the selected file type will be used.
Owner: Select an owner for the webcam. Only users with the same owner will be able to view this webcam.
Site: A webcam can be connected to a specific site. If viewing a site connected to a webcam and the webcam is active, then browsing data for the site will show images from the webcam for the same period as the site.
Page: When a webcam is connected to a specific page, then only when viewing that particular page will the webcam be updated.
Active: If the webcam is active, then the directory is monitored, and new pictures are uploaded to VDV.
Update Monitor: Monitor the webcam folder and send out an alarm if images are not being updated. Select the limit and Contact Group which will receive the alarm.
Press Save when done.
Delete Photos
With Batch Delete Photos, users can delete webcam images from the database and web folders. This can be done if the webcam folder is getting too large, the images have been backed up, or for whatever reason.
The Hour Filter is helpful if only images from specific hours of the day are to be deleted. For example, delete all photos between 8 p.m. and 6 a.m., when the project site is empty.
Select the period to delete images from.
(Optional) Select the start and stop hours for the Hour Filter.
Press Delete Photos to remove the images from the selected period.
